Archive
Rhyan End Table – Redux (2)
I may have mildly annoyed some of my family members (which I love very much) but I resolved to work in my shop all three days of the long MLKJr Holiday weekend. Saturday I moved a step or two closer to completing the second night stand for Susan.
Panel Prep
As designed this piece requires two solid wood panels for a top and lower shelf. One evening last week Susan was attending a Continuing Ed event in town to I decided to work in my shop while she was away. My goal was to joint and glue up both panels which I completed in a couple of hours. I used my ginormous pipe clamps on the larger of the two panels (the top) and the tape seam method for the smaller. This method is similar to those I’ve seen used for joining guitar tops and as simple as it is, has worked well for me. Each panel was made from two pieces.
Saturday, I removed the panels from clamps, sharpened my scraper and leveled the surfaces by hand. The glue-ups weren’t perfect but they were pretty good. One panel had very a slight gap along one edge but this would be the bottom surface and not visible. The other had a slight ridge which had to be leveled with careful hand planing followed by scraping.
After that I chucked up my 1/2″ round-over bit and edged all four top surfaces on both panels.

Panels are ready for sanding and top coat.
I was on a roll so while I had the router set up, I went ahead and cut my drawer fronts to length and put the same edge profile on them.

Earlier in the morning I took the night stand case out to the car port and sprayed another coat of green paint albeit a different color. To my annoyance I couldn’t remember whether or not I had selected Hunter Green or Palmetto thinking it always to be the former. After two trips to Lowes I found the Hunter Green I was after only to realize upon returning to my shop that I really wanted Palmetto after all. Oh well here at the Turtlecove Workshop our motto is “Smoke ’em if you got ’em”. So the Hunter Green now covers the previous Palmetto and we will now have His and Hers in slightly different shades of green.
The next step would have been to spray top coat over all the pieces but it rained all day so I decided to move on to my next build……
Hey great to see you again, thank-you for joining me in the shop….
Rhyan End Table – Redux (1)
Susan and I finally made it out to Melrose (Turtlecove) for a very quick overnight during the Christmas break. I seized the opportunity to “deliver” the recently completed night stand to my side of the bed. Apologies for the horrid photo.

Night stand #1 was a success, now Susan wanted one for her side.
The Carcass
Of course it is always a big help to have previously built a piece and this held true as I cranked up the case build on night stand #2. One of those things I was hoping to avoid was gluing up my own 2 x 2 stock but after a couple of trips to the home center and looking around online I realized that I was going to have to “bite the bullet” and make my own stock as I did the last time. On this occasion I decided to glue all the pieces up at once using my pipe clamps.
Each piece of 1 x 2 was cut an inch over final length on my miter saw. As before I began by jointing one (wide) surface of each piece making sure to mark the reference side. After generating (almost) enough pieces I performed a single glue-up in my 8 ft long pipe clamps. I would be gluing every other piece (forming pairs) and I considered how easy it might be to screw up so I wisely used the cabinet maker’s triangle on each pair to quickly and easily identify glue surfaces which were also reference surfaces I might add. I used wax paper under and over the stock to protect my clamps and added a panel on top to keep downward pressure. The result was a successful glue-up and yet another horrid photo.

Gluing up 2×2 stock for the night stand.
While the glue was drying I spent the time roughing out the plywood panels for the case. Unfortunately I don’t have an easy way to rough cut larger plywood pieces down to table saw size so I use a circular saw and a shop made rip guide. This is definitely one area where my jigs and method desperately need improvement and I’ll be giving this some thought.
Assembling the case pieces began the following day.

Constructing the case sides and back.
This go round I was trying to be careful how I oriented the glued-up 2 x 2s in an attempt to be a) consistent and b) reduce the dimensional mismatch in width and height. Last time I recognized it could be a problem then proceeded to assemble incorrectly anyway 😦 Not this time 🙂

Case assembled by the end of the second day.
Drawers
I was pretty happy with the progress. In two days I had made the carcass and it didn’t even rock when placed on a flat surface. Yeah!

I started on the two drawers.
I didn’t happen to have enough 1×6 select pine for the two drawers but I did have some wider stock on hand. I decided to go ahead and rip down what I needed so I could keep working on the drawer cases. Once again I pulled out the table saw dovetail jig and with fair success, cut all my tail boards for the drawer sides. I haven’t really had that many opportunities to figure out the nuances of this device but I’m starting to sort it a bit. Instead of using the left and right side for tails, I’ve decided it makes more sense to flip the board instead. This means the angle will match but also requires me to mark both sides of the board. The added benefit is not having to stop and move the jig or tweak the blade height more than compensates for having to mark both sides of the tail board. Tails usually come out pretty respectable but it is the pin board that gets me all confused. This time I figured out that I could mark each side with a different colored marker. I used orange for one side and blue for the other. I also used the same colors to mark the jig and placed the marks on the outer edge of the waste so that I visually could see not only which line to cut but also which side of the kerf to align the mark. Again it took time to mark all the pin boards and to use the colors but it saved time by not ruining my project with a bad cut. Although my resulting dovetail joints were amateurish, I’m getting much closer to figuring out a good method. With just a bit more experimentation I think I can figure it out. Next time I’ll cut my pin board first and will experiment on how much meat to leave on the tail so that it is tight without time-consuming whittling to get it to fit.

Drawer cases completed.
Lessons Learned
The one thing I have been better at is that I have been taking time to address nagging problems rather than muddle through and press on. Sure I’d like to “get step X completed” but I’d also like to go ahead and fix or tweak things that I have been neglecting. For example, my bench top bench has found a recent home on top of my B&D Workmate and the way I had it secured part of the stand blocked longer boards as I clamping them in the moxon. So for shorter boards, not a problem but for my drawer sides it was in the way. Now this wasn’t a quick nor a simple fix although it seems that it should be. Never-the-less I finally came up with a serviceable fix and that particular problem has gone away. Yeah!
Another example, I finally took the time to mill up some wooden cauls for my pipe clamps. They only took about 30 minutes to cut, drill and screw but I had been putting it off because I don’t use the clamps very much. I’m glad I finally took the time, now I will probably use them more.
Yet another example; my Rockler router lift was slipping so the bit was getting pushed down as I lowered the board on to it for a stopped groove. Irritating to say the least. So I stopped, opened the manual (I save PDF versions of manuals for any tool I’ve purchased on Google Drive). Now I know how to adjust the tension and won’t hesitate to do it in the future as needed.
I also got tired of the lead snapping off on my 0.5mm pencils so while I was at Office Depot the other day I purchased the hardest lead they had, 2H (4H is the hardest). During my build I stopped and swapped out all the lead in my 0.5mm pencils so I wouldn’t be frustrated with every mark. Now my lead is reasonably solid and I can mark with confidence, and it’s one less frustration.
There are still plenty of other nuisances that I ran across this weekend and I’ll be working on solutions to those as well. Right up there at the top is a safe, easy method for cutting down sheet goods.
So what’s my point? I’m trying to take back control of my shop and taking time out to sharpen a chisel or plane blade, adjust a piece of power equipment or manufacture a jig are just part of the build process. In 2016 I’m embracing that fact!
Hoping to make my shop a better place to play!
Rhyan End Table – Part 3 (Finished)
I mentioned in my last post that I had taken last week off and although I had completed a fair number of chores, I procrastinated on adding my final applications of top coat to the night stand. Down to the wire on the last day off (Sunday) I finally dragged everything outside with the intention of applying two final coats. If you ever saw the movie “A Bridge Too Far” then you’ll understand what happened to me. Although I had squandered all those beautiful sunny days, Sunday morning was very overcast. I spayed my first coat and was hoping to spray the final coat in about 2 hours. While I waited, I worked on other projects in the shop. About an hour and a half later I suddenly realized that it was pouring down rain. No not a little sprinkle, we’re talking puddles of rain. I was “horrified” and dragged everything under the cover. The great news is that General Finishes High Performance Top Coat really does dry quickly. So much so that I was able to wipe everything down with cotton rag with no noticeable ill effect on the finish. So basically I got what I desired but luckily, no harm done. Not to self; “come up with a sensible spray booth solution”
Remaining Tasks
So calling the finishing done, three tasks remained for completion. I needed to 1) fit the lower shelf (probably shouldn’t have made it so close to tolerance) 2) figure out how to attach the top 3) install the drawer slides.
Although this shouldn’t have taken more than one shop day it actually ended up consuming both Saturday and Sunday. I spend most of the day Saturday struggling with fitting the drawer slides. First off, I have never fit any slides period. The slides are purchased were inexpensive Euro Slides from the home center. The directions called for a clearance of 1″ side-to-side which I knew and had factored in when making the drawers. I didn’t read anywhere about the gap required at the top of the drawer necessary to feed the drawer onto the rails. I had added a rail between the two drawers which would have left perhaps a quarter-inch gap for each drawer top to bottom. But struggle as I might, I just couldn’t get it all to work out because there need to be at least 1/2″ in order for the door slide rollers to pass by one another. Yes, I’m a moron but it took me a while to break down and remove the center rail. By then I had struggled so much and been so frustrated that I just had to call it quits and start again on Sunday.
By the time I made it to the shop on Sunday morning, I had already watched a YouTube video on the installation of this style of drawer slide. The video gave a couple of great tips on assembling drawers (which were of no use to me now) a one use tip on using a spacer to support the slide while marking the position on both sides of the carcass. With this knowledge and with some trial and error I was able to get the drawers functioning.
The final challenge was to affix the top. I you happen to notice, under the solid wood top is a plywood panel so I wouldn’t be attaching the top to apron as is done in most situations. A further complication was that I felt I wanted the panel to “float” which I thought would add shadow and therefore dimension to the piece. I questioned whether or not I was going to be able to gain enough access from underneath considering the plywood sub-top. One option was to cut through the center portion of the plywood piece, leaving the outer edges and corners to add strength. In the end, I was hoping for as simple solution as possibly and I came up with cutting the discarded rail (see above) into 4 pieces and screwing them to the plywood top. I then drilled down through the center of these shims piercing the plywood sub-top. I then positioned the top and using a punch marked the top to drill for screws. At that point it was a simple matter to use a screw up through the pre-drilled holes and into the top. Of course this had to be done with a hand powered screwdriver and a shot one at that. Wood movement is possibility but I’m not shipping all over the country and it is probably about as humid as it’s going to get so it might shrink but hopefully not swell.


I think it turned out pretty nice. Clearly if I built another one I would make a couple of modifications which would save aggravation and Susan wanted me to build a second one for her side of the bed. I told her if I build another one I want to paint it purple. She looked confused……..

Nest up: Time for the Turtlecovebrewer to get busy making toys for big boys and girls. He also needs to brew but where is he going to get the time???
Rhyan End Table – Part 2
So November 5 was my birthday so I had decided to celebrate by taking the entire week off work. You would have thought that I would have accomplished an amazing number of tasks in the shop but alas, I only managed a few. The week never-the-less was well spent and turned out to be a pretty good mix of family chores, relaxing, reading, practicing instrument and shop time.
Panels
My intended design is a mix of painted surfaces and natural tops and drawer fronts. Because the top third of the carcass is exposed I wanted to add a second solid panel to this surface. Below was the actual top which will overhang the carcass an inch on all sides.

For the panel which covers the drawers (the lower top) I used nothing but tape to secure the two pieces while the glue set. This is method often used by luthiers when gluing acoustic tops. It worked quite well and I found there was less movement of the two pieces then overzealous use of F-clamps. More efficient glue clean-up as well.

Mockup
With most of the components constructed, I mocked up the night stand. The “lower” panel hadn’t been glued up, if you’re wondering about the wood sticking out of the side. Turns out I bought another board rather than use these scrap pieces.

Paint and Top Coat
I used one can of forest green spray paint for the carcass which I applied in three coats. The drawer pulls were purchased from the home center and I would have preferred them to be slightly larger but these were all they had. Pulls were also painted.


For the top coat I used my groovy new Fuji Semi-PRO2 hvlp sprayer. I was clueless which model to get the gravity or siphon feed so I did my best to read various opinions on the matter. The gravity feed has the benefit of, well, gravity which is supposed to be of advantage however to me the gun looked top-heavy. The siphon feed appeared to have a larger capacity but in theory wasted more product. Then there was the question of which profile allowed you access to where you needed to spray and on the debate went. I opted for the gravity feed which it turns out can easily be converted to siphon feed should that turn out to be necessary. So far I see no reason for this.

Other than the fact that I need practice I found the sprayer was relatively easy to use. Expect there to be a learning curve as you figure out your air to finish ratio, fan pattern and spray technique. This project allowed me to at least discover some of these variables and controls and I believe that I’ll get better. Over all I didn’t find it that difficult to get started. I did want to build a small cart to house all these components. Possibly modify a small hand truck with a storage bin and place to wrap up the hose and electrical cord. I haven’t really decided though.
Stay tuned, I’m almost there
Rhyan End Table – Part 1
I found the free plans for this build on the Ana White website. This site isn’t for uppity woodworkers (or should I say wood craftsman??) rather it is a wonderful place for average folks like me to find all kinds of DIY inspiration. Kudos to Ana and the scores of folks who are “simply making stuff”!
My wife Susan and I inherited bedroom furniture from my Mom which we needed for our second home in Melrose, Florida. It was so wonderful to once again have a king sized comfortable bed and dresser making the place look lived in once again. The set came with one night stand and we really needed one for each side of the bed so being a Maker, I decided to build one. As often happens the decision to build a night stand sent me chasing my tail looking for plans. I found some very nice arts and crafts tables that I liked but I just didn’t think I had the time and desire to invest so much into this project at this time. I’d still like to do it at some point but for now I wanted something attractive yet inexpensive, fast and easy to build. The good news, I found many free and varied plans but it took a while to find just the right one. Then Viola! I found the Rhyan End Table build on Ana’s site.
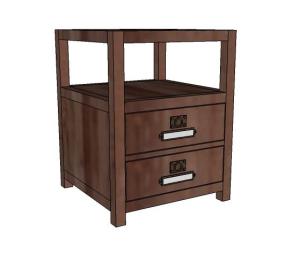
Rhyan’s End Table as posted on Ana White
It was such a versatile plan and many folks had modified it to fit their own needs and décor. This plan turned out to be the perfect base from which I could match my Mom’s furniture which was a painted dark green.

Mom’s Furniture was… well it is Green!

I wasn’t going flashy but I did decide to use solid wood tops and drawer fronts. I borrowed the SketchUp model and put my own spin on the design but really other than paint and the use of solid wood accents, I changed almost nothing.
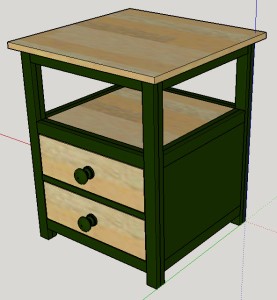
Rhyan End Table (Night Stand) design was tweaked for the Turtlecove Celestial Love Chamber
I will bevel or round over the top panel edge, I just didn’t take the time to add that to the SketchUp plan. Actually I did on the first attempt but when I increased the top size to 22″x 22″ I didn’t struggle with the second panel. I’m still a bit loose on the “Follow me” tool.
The plan called for 2″ x 2″ stock but not finding suitable at the home center I decided to laminate two pieces of 1″ x 2″ stock instead. This did require more work of course but it did give me an excuse to use the new jointer which worked beautifully for me. I also attempted to use the planer mode for the first time on the pieces for the panel top and I still have a great deal to learn in that respect. I shouldn’t be surprised, it was my first attempt after all.
Carcass Build
I suppose I should hide my head in shame that this build uses butt joints held together by glue and pocket hole screws. Well so what! Ha, there I’ve said it. I am very confident this piece is structurally sound and I have no doubt it will hold my drink and remote control without collapsing! It might be hard to believe but I actually haven’t built very much using pocket hole joinery. I believe the bench top router table was the only other time I used pocket hole screws. Now I have used plugged, counter bore screws and glue exhaustively in other builds. Anyway, that is all the apologizing that I am I going to do about pocket holes. The carcass is built and I have glued up the top panel. You may or may not have noticed that the lower shelf is recessed. I decided to go ahead and build the carcass with plywood and follow-up with a solid panel on top of the ply. This also allowed me to correct a huge mistake that I made when assembling the laminated 1″x 2s”.

Carcass is built
I realized that these glued up pieces would not be exactly as wide as they are thick and of course this can throw off registration when assembling the carcass. Realizing and doing are two different things and of course I glued them up in random mixed fashion. Had I been a proper woodworker, I would have not only realized the necessity but I would have also carefully marked my stock before assembly. Rookie mistake which I just had to soldier on through and work-around. Often, even when I make my stock I ignore the marks and glue it up wrong anyway! That is not how I want to roll so I now reprogramming myself to learn and not make these same mistakes again on future builds. After all, there are so many other mistakes that I have yet to discover, I want to leave future builds open so I can enjoy new bungles!
Next up I’ll be building drawers and finishing the tops but that hasn’t happened yet so you’ll just have to be patient…….
