Archive
Les Paul Special – Guitar Build from Parts
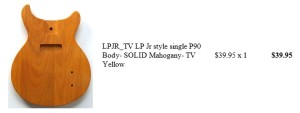
No doubt you’ve heard of a “Parts-caster” meaning a Stratocaster style guitar pieced together from individually purchased parts. Well I’m attempting a Les Paul Special Doublecut style build that I’m calling a “Les Parts Special”. I’ve been accumulating luthier tools and parts for a couple of years now but for some reason (fear, paralysis, etc.) haven’t really done much. Last weekend I began work on a parts electric guitar of intermediate difficulty. Basically I purchased a factory second body and neck which weren’t designed to work together along with other parts I ordered from Guitar Fetish and Stewart-MacDonald.
Build Challenges
There are quite of few details to attend to with the build but the main challenge was and remains fitting the neck. The body was purchased as part of a factory closure and was routed for a bolt-on neck and what appears to be at least one routing mistake. Lots of modifications to the body were going to be necessary to fit all the components which I had purchased for the project. Fortunately much of this work was somewhat straightforward. Fitting the neck to the body was not as you can see by these pictures.
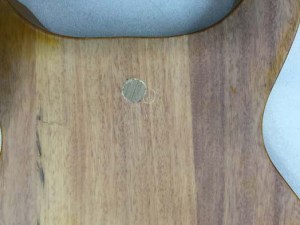
I got started by plugging a hole drilled in the body through the neck pocket. Not sure if this was part of the original design (perhaps for adjusting the neck?) or simply a mistake. I didn’t happen to have a nice piece of mahogany lying around and even it I did I wasn’t sure my plug cutter would be the right size. I opted for a low tech fix which was to temporarily plug the hole with a piece of dowel, then use a larger Forstner bit to make a new clean hole which matched the diameter of another dowel I had on hand. Not exactly elegant but functional non-the-less.
The dog ear style P-90 pickup I purchased was just a bit too big to fit in the factory routed pickup cavity and rather than routing the body, I decided it would be easier (and safer) to round the corners of the pickup mount with my bench grinder. This was surprisingly easy requiring removal of a minuscule amount of metal on all four corners.
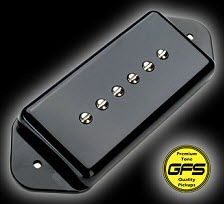
Had to round the metal pickup mount corners just a tad to get this pickup to fit in the factory routed pocket.
Before I jumped off the cliff with the neck issues, I tried fitting my groovy Stew-Mac LP Jr. premium wiring kit pots into the control cavity. To no surprise the high quality CTS brand potentiometers would not fit through the pre-drilled holes in the body. Rather than hunt and hope I had a drill bit of the diameter I needed, I pulled out my tapered reamer and finessed the opening so the pot threads would just push through leaving it snug.
I then noticed that when I attempted to test mount the pots the cavity was too small for the tone pot (volume was OK). I pulled out my trim router and my brand new 1/4″ Whiteside upcut spiral bit and freehand finessed the cavity walls until the tone pot had room.
Another rather straight-forward (and non-critical) activity was to add a little Gibson-esque mustache to top of the headstock. I wasn’t particularly worried about this detail but I happened to look in my tool cabinet and there was a Les Paul Jr. neck template that I had made years before. I looked upon this as a sign. After tracing the design on to my work piece, I rough cut it on the band-saw and cleaned it up with rasps and the oscillating spindle sander. The small nick in the middle was problematic and I used a variety of files (both size and shape) until it looked OK. Of course a real LPJR neck would be mahogany but this one is made from hard maple so files aren’t super efficient however the rasps worked well.
I also spent some time cleaning up the rosewood fretboard. I can’t put my finger on it but there was definitely a very thick clear topcoat sprayed on the edges of the fingerboard. This might have been OK if the enter board was sprayed but I didn’t like it and spent a good amount of time scraping it off and exposing the rosewood. It was tedious but I thick it’s going to look great once I get it oiled up. I used a razor blade with scotch tape covering all but a small portion of the cutting edge as demonstrated by Dan Earlewine.
Pain in the Neck
So here is where things went South. The factory neck pocket was designed for a bolt-on neck and I wanted to convert it to a set neck. Unfortunately as previously mention, the neck tenon of the neck I purchased (on the cheap) was not designed with my guitar in mind. I suppose the proper way to do this work would be to first make a router template. There problem here (besides the fact that this is my first build) is that I have to modify both the tenon and the neck pocket to make a workable solution. I decided to start with the pocket and then fit the tenon to the pocket. The plan was to leave the pocket shape intact and at this point just deepen the pocket to within 1/4″ of the back. I was going to freehand route again but this time I needed to support the router so I made an offset base from 1/4″ Lexan before starting.
Rather than nick the edges of the pocket I stayed well clear of the walls and cleaned the edges up with chisels.
The neck tenon was quite long and much taller than my body blank would accept. The pocket corners were round, the tenon was square so I chose to square off the neck mortise with chisels. So far, so good.
But wait, there’s more! The neck heal was still way too tall so I had to remove about 3/8″ from the bottom to level the fingerboard to the body. Now it should be noted that I had previously painstakingly reduced the width of the neck using rasps until I had an absolutely perfect fit. Now, I had to chop and angle the bottom of the heal. DISASTER!
So what I did was fit the neck, and measured how much material would need to be removed and rough cut it on the band-saw. It was messy but I left enough material to clean it up on the oscillating belt sander. It also occurred to me, and I worry that I need a 3 deg neck angle as well as getting everything to fit. The bottom line is that I have attempted a neck angle but the tenon is now very loose in the neck pocket. I’m pretty much flying blind at this point. I know that I’m going to shore up neck and glue that mother but I’m not sure how yet.
To be continued….
I’ve definitely got some work ahead of me but it sure is fun diving in and getting my feet wet. Getting the neck fit with a workable neck angle is going to be “fun”. Then locating the one piece bridge is also going to be interesting. I’m going to need to set up a temporary tailpiece or at least that is what I imagine should be done. I also have to shape and fit a nut but before I can do that I have to somehow scrape off all the black paint they put in the nut slot at the factory. WTF?!? Tuners are the least of my problem but the bushings I have for them are loose in the factory drilled tuner peg holes. Sigh…… as I said, this is the least of my challenges.
Having fun making stuff with the Turtlecovebrewer…..
Solid Body Guitar Makeover
Susan and I returned home yesterday from our week together celebrating 5 years of marriage. Actually I have been off since last Friday but Susan had to work Friday, Monday and Tuesday so it wasn’t until Wednesday last that we were able to get away. So let’s do the math here: (Art-home)+(Susan-working) = Shop-time
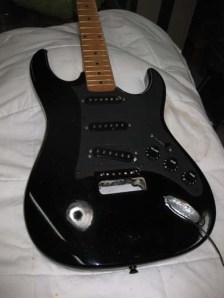
I’m pretty sure I mentioned in a previously post that I wanted to get started working on guitars this year and I’ve finally gotten a start. The plan was to get my feet wet by rehabbing an Ibanez CX140 fat Strat knock-off from the 90’s. I (foolishly?!?) picked it up from a pawn shop for about $30. Most of the components were still functional although the guitar was filthy dirty and the Tone potentiometer was blown. I didn’t want to spend very much money on this project guitar but…. I did want a project where I could learn and had some ideas about what I wanted in the end. In the end, I spent more than was strictly necessary but I didn’t crazy. My objectives were to 1) learn 2) fix the tone cicuit and 3) “black out” the looks.
Stabilizing the Neck
I began my odyssey by removing the bolt-on neck only to discover “I was not her first”. In fact two of the neck bolts were shorter than the other two and one of the longer bolts had been broken off in the neck. My first official act of lutherie was to remove the broken screw and plug the hole. I found that I could use one of my medium plug cutters to both extract the screw and make a uniform hole with one operation. Unfortunately I didn’t have any hardwood plugs that would fit the new hole. Doesn’t seem right does it but keep in mind the plug cutter makes a plug but that plug is much smaller in diameter than the hole it made cutting the plug. As a work around I used a larger plug cutter on a piece of oak then I carefully sanded it down until it just fit.
The rest of the neck was in decent shape although there was a rather annoying ding on the bass side that my thumb always knew was there. I decided to sand this area of the neck back to bare wood and use the steam heat trick to pop out the ding. I used my soldering iron and a wet rag and damned if it didn’t work. So I continued working out other smaller dings and then as you might expect I inadvertently touched the hot tip of the iron leaving a tiny black brand. It is only the size of a spec but you know, be extremely careful doing this sort of thing.
Cavity Shielding
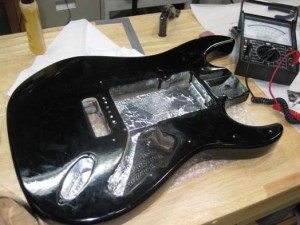
I finally bit the bullet and placed an order with Stewart-MacDonald for some of the parts I was going to need including conductive copper tape for shielding the control cavities. This tape isn’t exactly cheap so for this project I decided to use aluminum foil for shielding and save the copper tape for my first “original” build. I know, I know, how cheap can you get? Well, I’ve done some research and I know that aluminum foil works as does the metal tape I decided to use instead of foil. The real difference is that the sticky part of the copper tape conducts as well as the copper itself. This means that overlapping tape strips will conduct whereas with the aluminum tape this doesn’t happen. No worries, I can fix that.
I thought about connecting the strips with a dollop of solder but then realized that I could use a tiny piece of the copper tape to connect them. Used very little of the copper tape to bridge all the strips, presumably saving a bundle. Well I just didn’t want to spend a ton on this build (notice the “swimming pool” style route) so I still think this was a good solution.
Locking Tuners
The stock tuners on this guitar were chrome and although most of them worked I did have a couple that seemed very sloppy when tensioned. I decided to spring for the Guitar Fetish locking / staggered tuners in black. They weren’t extravagant ($35) but they were just what I wanted so I sprung for them. The good news, the bushings fit perfectly on the face side of the headstock so I didn’t need to do any work there. The not-so-great-better-learn-to-be-a-luthier news was that the tuner barrels were too big for the back of the headstock. Plus these tuners had one mounting screw and the old ones had two mounting screws and alas, none of holes lined up! So job one was to plug the twelve old screw holes and sand them flush. Then I used a stepped drill bit to carefully center in the existing hole while widening the shaft to the closest step on the bit. This left everything a tad to small so I hand fit each tuner using a T-handle reamer and some patience.
Even though this is my very first project, I have been paying attention and I have read where a lot of luthiers break screws during their builds. So what I learned is 1) make sure your screwdriver fits the screw head with no wiggle or play (learned this from Galeazzo Frudua) 2) make sure you drill an appropriate sized pilot hole (learned this from Mike Snider) 3) lubricate your screws with paraffin or bee’s wax (learned this from Chris Schwarz) 4) if the screw squeaks while you’re driving it STOP, back it out and widen the hole by wiggling around the (pilot hole) bit. You can run the drill in reverse so that you don’t deepen the hole. (also a Mike Snider tip). Knock, touch and work wood, I didn’t have a single problem taking this advice.
Once I had sanded and shellacked the back of the neck, I was ready for the final installation of the tuners. I lined them all up with a straight edge and drilled the holes for the screws.
Fitting the New Tremolo Bridge
Again I took a chance and ordered a new tremolo bridge mainly because I wanted the bridge in black. Vanity they name is Arturo. Well the new bridge looked great and seemed to be a bit beefier than the old bridge only it didn’t fit the opening on the top of the guitar. Turns out very little work was required as a very thin layer of material needed to be removed from each end and this was easily worked with a Dremel tool and small sanding drum attachment.
When lining up the new bridge, I was fortunate that the center two of the six attachment screws lined up with existing holes. This gave me a solid reference for lining up the new bridge but I did have to plug and re-drill the outer four screw holes before attaching the new bridge. I compared the new bridge’s spring attachment plate and bolts and they were essentially identical to the existing ones so I didn’t bother changing them from original. I haven’t yet setup the tremolo but with the bridge in place I moved on to the electrics.
Hacking the Pickguard
As I mentioned before, it didn’t make any sense to spend a lot of money fixing up this low-end guitar from the 90’s but I did have a couple of goals. First, the volume circuit worked but the tone circuit was fried. Second I wanted to “black out” the guitar so I wanted (but didn’t need) a black pick guard. Lastly, although I really like humbuckers I kind of wanted the “pure” Strat S-S-S setup mainly because I’ve never owned or even played one and I wanted to experiment.
At first I was just going to upgrade the pots and capacitors but I also had a wicked snap-crackle-pop associated with the 1/4″ jack. I decided to purchase a (black) pre-wired Strat pickguard from Stewart-MacDonald and was not surprised at all to find that it didn’t fit my guitar. Oh well I gambled and knew this was likely. I could have adapted the pickguard to my guitar but I didn’t like the idea of plugging and drilling all new holes plus I wasn’t happy about what I was going to have to cut off the pickguard (can you say mutilation?). Early in the project I had spray painted the white tremelo cover with some flat black paint I had on hand and decided it looked pretty good. This led me to the conclusion that spray painting the original pickguard was a viable option. All I needed to do was to purchase or fabricate a humbucker to single coil mounting adapter. Dude, I’m a woodworker so I can do anything I’ll just make one. In hind sight it would have been better to just buy the thing. I spent way too much time making the adapter and although it works, I could have used those hours to better advantage I think. And on a related note, I found out on final fitting that I’d have to trim the pickguard where it meets the new bridge (remember it was a tad larger than the old one). So in a dumb-ass-move I thought I could just chisel off the small piece of plastic. Fail, not only did the chisel not do what I was hoping, I managed to break/snap the thin piece of plastic which separates the bridge pickup and the bridge. I repeat FAIL!
Only after this did I bring out the Dremel with drum sanding attachment and perfectly fixed it in about 20 seconds. Now I have a blemish, what will I do?
Getting the humbucker-single mounting adapter right was the tedious part but I also needed to drill a hole for the second tone pot as the original only had one. So I eyeballed a good spot in between volume and tone and drilled a pilot hole before widening with a stepped drill bit. I didn’t want another split or cracked piece of plastic. This went well and I mounted and installed the newly populated and painted original pickguard.
Will it Play?
Answer yes, all the electronics and tuners check out. But I haven’t taken it back to the basement to set it up so it is very difficult to play bordering on impossible. Did I mention that I also replaced the plastic nut with a Tusq XL? Well I haven’t exactly shaped the nut properly so this is a big part of the problem. Once I shape the nut, setup the string radius on the bridge and float the tremolo I think it will be ready to play. So far its been a fun project and I am achieving my goal of learning by doing. I’ll keep you posted when I get her back into the shop.
I’m still here …..
My blogging schedule has been pretty pathetic as late but I’m still here and still kicking around my shop. Work has been very hectic but this has not stopped me from pursuing my goal of building my first instrument.
I’ve been learning basic woodworking skills now for a year or so and I decided that it was finally time to start building. I’m sure mistakes will be made but fear should also not keep one from doing, learning and growing. So I have begun to outline a plan of action.
- Get some “hands on” by rehabing my pawn shop Ibanez Strat copy from the 70’s. Nothing to loose and lots that can be learned by working on it.
- My first build from scratch will be a solid body electric.
- I’ll get some help. I purchased a wonderful video course on from O’brien Guitars, “Electric Guitar Building“
The course is $197 so I was a little hesitant at first but pulling the trigger on it was the best decision I could have made. I’ve pretty much watched the training twice although there are probably a couple chapters that I missed because I’ve not watched straight through in order. Mike Snider of Snider Guitars builds two styles of solid body electrics, a Tele and a Les Paul from scratch. Mike builds both from start to finish leaving nothing out including winding his own pickups and inlaying his mother of pear logo in the Les Paul headstock. Watching doesn’t mean you can do it but it surely is a confidence builder. I will obviously take my time and review each video prior to attempting any work.
Course Content
Chapter 1 – Design – 51:18
Chapter 2 – Templates – 36:35
Chapter 3 – Body Blank Prep – 26:25
Chapter 4 – Routing Cavities – 14:44
Chapter 5 – Shaping and Drilling – 33:51
Chapter 6 – The Neck – 2:11:51
Chapter 7 – Attaching the Necks – 44:45
Chapter 8 – The Carved Top Body – 21:39
Chapter 9 – Neck Shaping – 35:40
Chapter 10 – Inlay – 1:13:00
Chapter 11 – Fretboard Radius – 13:27
Chapter 12 – Control Holes – 11:22
Chapter 13 – The Carved Top Neck – 4:59
Chapter 14 – Fretwork – 58:29
Chapter 15 – The Bridge – 24:11
Chapter 16 – Finishing – 1:16:34
Chapter 17 – Pickups – 1:36:16
Chapter 18 – Guards and Covers – 14:20
Chapter 19 – Assembly – 54:24
Chapter 20 – Setup – 19:19
Chapter 21 – Wiring – 24:17
Chapter 22 – Finishing Touches – 10:39
