Archive
Thien Baffle – Part 2 / Crosscut Sled – Part 3
In celebration of my birthday I took off work last week which translated into several days of shop time. I had been in a bit of a slump with some of the projects and it was good to get my mojo back to face them.
Phil Thien’s Cyclone Separator Lid
I had already finished the majority of the build on this garbage can separator but I hadn’t had time to run all the 4″ DC plumbing to my equipment. I essentially needed to turn this:

Into something more like this so I could test the separator.

From all appearances the separator is working . I completely cleaned out the larger shop-vac and sucked away. Not surprising at all, the shop-vac is very much under-powered for this service but it is a start and way better than nothing at all. I also plan to add a couple of handles to the separator lid so I don’t have to pull on the hoses to dump the garbage can. Originally I was thinking metal pulls but it makes more sense and would be more thrifty to build them from scraps of wood.
One of my next projects will be to figured out a way to contain dust from my miter saw. I’ve gotten used to using it but it make an ugly mess each time and I’d like to get that under control. I don’t have enough room to build a box type collector behind the miter saw as my band-saw is essentially butted up too closely against it. I was considering a canopy draped from the ceiling or perhaps a modified umbrella. I’ve even considered a modified box constructed of a frame with cloth stretched over like a “tent”. I’m still searching for ideas. Just to drive my point home here’s a pic. It looks like it’s been snowing after extensive use of my friend the miter saw.

At least I had somewhat effective collection on my table saw this weekend. The vac won’t evacuate the table saw completely but will suck airborne dust and even settled dust if I sweep it into the intake. I obviously need a real DC device at some point but this is a good start.
Crosscut Sled – Part 3
I picked up a handful of 2″ 1/4″x 20 bolts and used an additional length of recycled broom handle to make the attachment knobs for my adjustable mouth crosscut sled. The previous 2 knobs I constructed turned out to be too short so I am saving them for another project. I needed 4 knobs anyway, 2 for the adjustable plate and 2 for the removable extended fence (below).

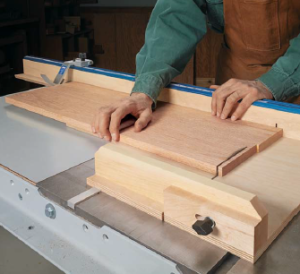
I have a sheet of clear acrylic that I picked up from Lowes and have been saving to make templates for guitar bodies. I snapped off a piece and cut the blade guard to shape on the band-saw. Now, if I can figure out a way to tint it red without making it opaque I’d be in business. Finally, the completed crosscut sled.

I moved on to construction of the optional extended fence. The fence attaches to the sled with 2 additional bolts. It is thin and lightweight yet can provide the support for pieces up to 42″ to the left of the blade and about 6″ to the right (cut-off side)

The way my shop is currently arranged I’d have to pull my saw away from the way to actually use it but I wanted to build it anyway.
There is one more jig detailed in this plan, a box-joint attachment. The device leverages the pricey Kreg top track and micro-adjuster which I have not purchased. I can see how they could be home-built but the main issue is that I don’t even have a dado or box-joint stack to use the jig. The idea of making box-joints interests me but this is a futures thing so I might put it off a bit. What I’d really like to come up with would be an adjustable miter jig for the sled. Now that the basic sled has been constructed I can scheme.

Small Separator Baffle – a la “Stumpy Nubs Homer Bucket”
You may recall my small separator baffle build ended up initially in “failure mode” so I ended up putting the project on hold. Having several shop days, I gathered my strength and courage and attacked the project once again.

I fired up my compressor and added triple the number of support struts. The plastic bucket skin I last tried was another complete fail so I reverted back to the aluminum flashing I had on hand from the first attempt. I’m hoping the additional support will be enough to keep the thin metal skin from buckling again. Hell, they say you could punch a hole in the skin of the lunar model with a screw driver so maybe this will work?!?!? I caulked the heck out of it and I’m letting it setup for several days before the test. I’m glad that I attempted another build on it but I’m not at all happy with the design and I’m almost ready to scrap the project. This last attempt will either work or more likely it won’t but either way I’ll not attempt another build of this device without a completely new design. Then again, there is always the Dust Deputy!
You have been reading an excerpt from the shop journal of the Turtlecovebrewer.
Thien Baffle / Crosscut Sled – Part 2
Last weekend I made my way back to the shop and projects which have been waiting for my attention.
Phil Thien’s Cyclone Separator Lid
Working from the Phil Thien’s cyclone separator lid page, I did my best lay out and fabricate parts to assemble my version of the chip separator. I started by tracing around the outside diameter of the 3″ PVC coupling I would use as a through (bulkhead) in the lid. I drilled a pilot hole and cut the bulk of the through hole out with a skill saw. Using a drum sander attachment on a hand-held drill, I smoothed and widened the hole until I had a perfect fit with the PVC coupler. I made two of these one on the edge for vacuum intake and one dead center for the vacuum exhaust. Mocking up the PVC elbow in the top lid I made my best guess-timate how far into the can the bottom lid would protrude and measured the diameter of the can at the level. The trick her is to get the near edge close to the can wall for a nice fit while not making it too big and having to hog off a log of material with a shave or drum sander. The spacers separating the two lids where cut from a recycled broom handle (hey, I had dowels that would have worked I just decided to use these instead).
Using a protractor, I measured a 120° arc then measuring in from the edge I came in 1.225″ drawing an inner arc around the remaining 240° arc of the circle for the chip fall-away zone. That 1.125″ measurement sounds silly but Mr. Thien’s research should a 2.25″ drop zone to be best for separating so who was I to question his findings?
Here is a dry fit of the baffle as I sort out placement of the spacers. I pre-drilled and countersunk 1 1/4″ screws into the spaces to hold the two pieces together.

I used 4″ dust collector hose fittings for both the intake and exhaust side of the baffle. I had to trim a small piece off the edge of the intake fitting then I ran a bead of sealant caulk and fastened them with 1/2″ screws. Ditto for the exhaust side.

At this point I’m almost ready for a test. I rigged up a 4″ to 2 1/4″ hose adapter so I could attach the unit to my shop-vac only to find out, it doesn’t fit. I could attach the plastic tools to it but the hose diameter matches exactly the diameter of this adapter.

So I left it there. I need to pickup another 3″ PVC coupling for the exhaust bulkhead and then I’ll rig up my other adapter that will fit the shop-vac hose. What a racket they have made from vacuum cleaner hoses and fittings?
Crosscut Sled – Part 2
I am still struggling with how to easily and properly install the 1/4″ x 20 threaded brass inserts into my crosscut sled fence. I experimented by drilling a larger than recommended hole but this time the threads didn’t catch enough to secure the insert. I’ve ended up basically drilling a hole the same diameter of the insert and using epoxy to secure it. Frustrating indeed.

I’m trying to think things through but it seems like a juggling act to get all the pieces in place .

So with the front and rear fences attached to the off-cut panel, I attempt to line up the front fence so it can be screwed down square to the blade.

I’m still working to line everything up which has been tricky. Stay tuned, this project is still underway.
You have been reading an excerpt from the shop journal of the Turtlecovebrewer.
Crosscut Sled
I would venture to say that almost any woodworker with a table saw either has made or at least heard of crosscut sleds. Some are of very basic construction and others are designed for multiple functions in mind. As it is with most woodworking philosophies there are many opinions on the subject. Purists might choose to quickly build a specific sled, quickly and with a single function and purpose in mind. Others would prefer the sled to be flexible and adaptable to many functions and purposes. What’s my opinion? Well I fall somewhere in the middle, here are my criteria.
- At this point I really do best with an actual plan. I may stray from it but I need something to get me started. Preferably the plan is free.
- It needs to be relatively easy to build because I’m not that skilled.
- I’d like it to do more than crosscut a piece but it doesn’t have to perform “every” function. But if I’m going to build one it will hopefully serve multiple purposes.
If all else fails, it gives me some quality time in the shop to grow as a woodworker.
Of the 3 (free) plans I have collected, I opted to attempt the “Precision Crosscut Sled” as published by Woodsmith.PLANS (plansnow.com). They do charge for plans (this one is normally $6) but they also throw out the occasional freebie to keep us all looking.
The feature possibilities with this plan are.
- Adjustable “zero-clearance” base. So one doesn’t need a new sled for every blade set. (Think dado stack).
- Optional box joint jig with micro-adjuster
- Optional fence extension for longer stock
- Reasonably compact design
That said, many of the fancy features of this setup are simply precision Kreg accessories which I have not ordered yet. I’ll have to see how much I can afford to spend on these parts but on the bright side, they can always be re-purposed and used on other shop jigs should this project not be fully successful.
One of the interesting nuances of this build is that the pictures are drawn for a right-tilt table saw and mine is a left-tilt. They have a drawing for that also but all the dimensions are on the former drawings so I’m doing a bit of flipping about. It’s worked out so far, I hope that continues. So far, I’ve cut and shaped the base pieces; cut the small dado and milled a miter bar. I’ve also cut and shaped the primary fence pieces.

The project calls for the use of several threaded brass inserts which I have but unfortunately, I have no tools to install them. I need a properly sized tap and an insertion tool and I have neither on hand. Well, it’s always something, the plans are free but the build hardware will cost a small fortunate.
You have been reading an excerpt from the shop journal of the Turtlecovebrewer.
