Rhyan End Table – Part 1
I found the free plans for this build on the Ana White website. This site isn’t for uppity woodworkers (or should I say wood craftsman??) rather it is a wonderful place for average folks like me to find all kinds of DIY inspiration. Kudos to Ana and the scores of folks who are “simply making stuff”!
My wife Susan and I inherited bedroom furniture from my Mom which we needed for our second home in Melrose, Florida. It was so wonderful to once again have a king sized comfortable bed and dresser making the place look lived in once again. The set came with one night stand and we really needed one for each side of the bed so being a Maker, I decided to build one. As often happens the decision to build a night stand sent me chasing my tail looking for plans. I found some very nice arts and crafts tables that I liked but I just didn’t think I had the time and desire to invest so much into this project at this time. I’d still like to do it at some point but for now I wanted something attractive yet inexpensive, fast and easy to build. The good news, I found many free and varied plans but it took a while to find just the right one. Then Viola! I found the Rhyan End Table build on Ana’s site.
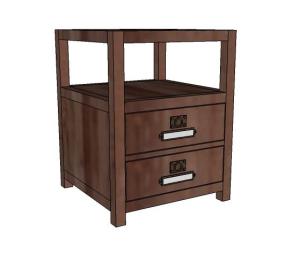
Rhyan’s End Table as posted on Ana White
It was such a versatile plan and many folks had modified it to fit their own needs and décor. This plan turned out to be the perfect base from which I could match my Mom’s furniture which was a painted dark green.

Mom’s Furniture was… well it is Green!

I wasn’t going flashy but I did decide to use solid wood tops and drawer fronts. I borrowed the SketchUp model and put my own spin on the design but really other than paint and the use of solid wood accents, I changed almost nothing.
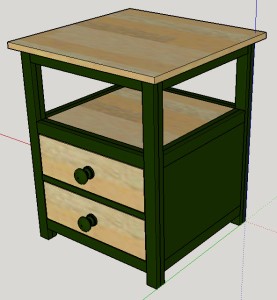
Rhyan End Table (Night Stand) design was tweaked for the Turtlecove Celestial Love Chamber
I will bevel or round over the top panel edge, I just didn’t take the time to add that to the SketchUp plan. Actually I did on the first attempt but when I increased the top size to 22″x 22″ I didn’t struggle with the second panel. I’m still a bit loose on the “Follow me” tool.
The plan called for 2″ x 2″ stock but not finding suitable at the home center I decided to laminate two pieces of 1″ x 2″ stock instead. This did require more work of course but it did give me an excuse to use the new jointer which worked beautifully for me. I also attempted to use the planer mode for the first time on the pieces for the panel top and I still have a great deal to learn in that respect. I shouldn’t be surprised, it was my first attempt after all.
Carcass Build
I suppose I should hide my head in shame that this build uses butt joints held together by glue and pocket hole screws. Well so what! Ha, there I’ve said it. I am very confident this piece is structurally sound and I have no doubt it will hold my drink and remote control without collapsing! It might be hard to believe but I actually haven’t built very much using pocket hole joinery. I believe the bench top router table was the only other time I used pocket hole screws. Now I have used plugged, counter bore screws and glue exhaustively in other builds. Anyway, that is all the apologizing that I am I going to do about pocket holes. The carcass is built and I have glued up the top panel. You may or may not have noticed that the lower shelf is recessed. I decided to go ahead and build the carcass with plywood and follow-up with a solid panel on top of the ply. This also allowed me to correct a huge mistake that I made when assembling the laminated 1″x 2s”.

Carcass is built
I realized that these glued up pieces would not be exactly as wide as they are thick and of course this can throw off registration when assembling the carcass. Realizing and doing are two different things and of course I glued them up in random mixed fashion. Had I been a proper woodworker, I would have not only realized the necessity but I would have also carefully marked my stock before assembly. Rookie mistake which I just had to soldier on through and work-around. Often, even when I make my stock I ignore the marks and glue it up wrong anyway! That is not how I want to roll so I now reprogramming myself to learn and not make these same mistakes again on future builds. After all, there are so many other mistakes that I have yet to discover, I want to leave future builds open so I can enjoy new bungles!
Next up I’ll be building drawers and finishing the tops but that hasn’t happened yet so you’ll just have to be patient…….

I really like the design. I’ll be looking forward to the next instalment
Thank-you my friend! I have next week off so I’ll definitely have some time in the shop to work on this and start Christmas projects.