Archive
Wooden Beer Totes – Design Phase
I love listening to pod-casts while on my daily commute and one thing I hear fairly often from brother Marc Spagnolo is that with each project woodworkers should consider challenging themselves by trying something new. For me darn near everything is new so this means getting better at the things I’ve tried before while incrementally adding new things. As a brewer and “beer ambassador” this idea of making a wooden six pack holder seems to be, well obvious. Looking around the web, I have seen many variations of the beer tote and some I like very much and others seem a bit utilitarian. In the spirit of challenging myself, I thought it time to design a tote of my own. If building projects in the shop taught me something about patience, designing the projects as I go has forged patience into my work habit. Perhaps a bit dramatic and overstated, I just wanted to convey that designing as you go can be time consuming and one shouldn’t be surprised if the project gets built a few times before the production run…..
First the logo
I’m still seeking a logo for “Turtlecove Brewing”. I have ideas about what I want but I’m not particularly good at free hand drawing so progress has been lingering. I have been seeking a freshwater turtle that can be (easily?) drawn in silhouette such that it can be used as part of a logo AND inlaid in wooden projects such as a guitar head stocks, etc. Google Images has helped but I just wasn’t typing in the correct search criterion. Logo, tattoo and pictures didn’t yield what I was looking for but “silhouette turtle” was fruitful. One of the problems I have is I don’t want a cartoon and I’m not interested in sea turtles. There is a huge sea turtle following BTW, no problem finding something in that style.
I finally found something I liked on a lady’s back (of all places). I don’t think this is the end to this story but at least it is a beginning to it. This is what I came up with.

I brought the captured image in to Photoshop and spent a little time cleaning it up. The image is pretty complex and a bit tiny for inlay work but for this project, it will do.
I also had an idea about the Turtlecove signature so I went through all the fonts I had loaded on Photoshop and went to work. I landed on Segoe Print for “Turtlecove” and Segoe Script for “Brewing”. Both are arched but in separate layers.
![]()
Not bad, I think I can work with this…..
Tote Design
To me, the key to making this design “my own” was going to be in shaping the sides. The most common and albeit easier to mass produce sides where simply angled at the top. I felt I needed to complicate things by coming up with a more interesting shape. My idea, I wanted the sides to be “bottle-shaped”. So again I looked to Google images in search of the right bottle. A wine bottle style was too narrow at the top to be practical and besides, this is a beer tote. Growlers are stocky but typically have roundish bottoms and again this wasn’t as practical to construct. I settled on a jug shape a bit of a cross between an old milk bottle and a carboy. Looking over perhaps a hundred shapes, I found one that liked. Captured it and in to Photoshop for “fixing”. Here is the result.

Again, I’m pretty happy with the idea.
Building a Prototype – Saturday
So this is where it gets interesting, I spent Saturday building a prototype which would also be used as the part templates for the production run. I knew it would take longer to design and build then to just build from a plan but I’d estimate it took me about 3 times longer. Not only that but instead of setting up and running all the parts through the process. I had to move from setup to setup basically to test and fit a single part. So this is not news to anyone with experience and it isn’t even shocking to me. It’s just that I figured by the end of the weekend I would have all my templates made and be ready to rock for next weekend. But this was not exactly what happened……
On Friday after work, I made a quick trip to the lumber yard to pick up some cypress. Cypress is local, wet resistant, fairly light and relatively inexpensive. I build my prototype out of cypress and in the end found it to be unsuitable for this project. Never-the-less I was able to work out the kinks during this first build.


As it turns out, I was quit happy with the shape of the sides and I also liked the arched handle with through tenons. If you are planning on banging out of a lot of they bad boys, I would not recommend this design! Hand shaping the arched handle and hand chopped mortises are not convenient. If I really wanted a challenge I would also dove tail the sides to the bottom but I think for now I use screws and plug them. I do need to finish this project by the end of this year and I have already added many challenging new design elements to keep me busy.
What didn’t work on this prototype? The cypress was too soft and kept splitting on me. Both mortises have cracks at the top. I would also end up re-sawing thin stock for the sides and divider elements and not only would milling these pieces take time but the unpredictable thickness that resulted would make dadoes for the dividers a nightmare. I didn’t want to use plywood for the dividers, I felt it clashed with the cypress and I didn’t have a plywood bit for the router, etc.
Building Prototype Type 2 – Sunday
I never finished the build on Saturday but I almost did. I was hoping to have all the pieces cut and dry fitted by day’s end but this was not to happen. I did get all the pieces cut but alas, I realized the tote dimensions were too small. DOH!
First Susan noticed upon visiting that although my handle was curved, you would have to reach you fingers between the bottles to get a proper grasp. It was workable but certainly not optimal. I needed to make the sides taller. Next after milling and cutting the dividers I had a slight problem, the bottles in the center section didn’t fit. DOH! Forming the dividers from 1/8″ stock would have solved this problem but at this point, I was already committed to another prototype so I might as well make the tote longer as well. At this point I have opted not to make it wider and decided to stick with 1″x 6″ stock.
Sunday, I decided to go with pine. So armed with boards on hand and some new dimensions, I went back to the drawing board; and the miter saw and the band saw and table saw and spindle sander, etc..


So by the end of the day I had most of Proto 2 cut.
Improvements include:
- 1″ taller so easier to grasp handle and no split outs on the mortises
- 1″ longer to accommodate stockier bottles
- Pine is mostly free of knots and easier to work with
- Really took my time on the mortises and they are the best I’ve ever chopped
- I have a 3/8″ straight router bit so I can precisely cut the diver dado to fit the store bought stock (Yes!)
- Can’t really see it but there are 45° bevels on the side pieces
Tweaks
- I ran out of thin stock so I haven’t sized the center divider yet
- I’m not through shaping the handle. I’d like to perfect it before using it as a template.
- I need to sand the bottle sides, these are how they came off the band saw
To sum up the project, things are not going to happen as quickly as I first imaged however I do think that once I have a working model for templates, it won’t take nearly as long as I was beginning to fear. Many days to be sure. I’ll batch out ends and sides, then shape handles, then (ugh) mortises until …… well until it’s finished.
But what about the logo? The jury is out on this, I wish I had a branding iron……
You have been designing with the Turtlecovebrewer…
Turtlecove Brewing – Tour Part 2
I continue my whirlwind tour of the Turtlecove brewing process in this post. Apologies in advance for the lack of organization. If I was writing a how-to book I would have failed. Nevertheless, I wanted to document a few of the tools and processes I use at Turtlecove to craft my beers.
Racking the Beer to Secondary Fermentors
One of the interesting and sometimes confusing science facts about the brewing process is that sometimes we are trying to dissolve oxygen into our beverage and at other time times we are trying to prevent or limit exposure to oxygen. During the mashing process, beer is exposed to air but we do attempt to move it “gently” to limit the dreaded “hot side aeration” boogie man. During the boil, oxygen is driven out of the wort making the media a rather difficult place to flourish when the yeast are pitched. It is at this point, after the wort is cooled that brewers add oxygen to the media so that the yeast will add with “go forth and multiply”. We want to the yeast to reproduced rapidly and oxygen is needed for this to happen efficiently. Brewers typically only do this once at the beginning of the initial fermentation because it is the anaerobic metabolic process of fermentation that allows the yeast to derive energy from the sugar with alcohol and carbon dioxide as some of the recognizable metabolites. So the wort is oxygenated, the yeast bloom, the oxygen is pulled to zero and fermentation begins rapidly.

Here is my latest 10 gal batch of Rye Pale Ale in the chest freezer which has been modified for use as a fermentation chamber. The tubes coming out the top allow for the release of carbon dioxide lest the carboys explode. Obviously the beer isn’t frozen rather a temperature controller allows me to cool the chamber to the optimum fermentation temperature for the selected yeast strain. For ales this is typically 64-68°F and for lager strains 45-55°F. I should add that this is not the only temperature range where the yeast survive rather this is the optimum temperature to make beer which one would wish to consume. Yeast will survive at much higher temperatures but the metabolites and fruits of your fermentation would not be desirable to drink.
After about 7-10 days if all has gone well, your primary fermentation will have been completed. Please note, this is a grossly overstated factoid and this completely depends on many factors. One doesn’t judge completion by days rather it is judged by the beer. But for the ales that I like to brew and the yeast I like to use, I can usually count on about a week in the primary. At this point I like to move the beer off the settled yeast floc and in to a clean carboy. This is also an excellent time to add any adjuncts to the beer which is very commonly fresh hop cones (dry hopping). Dry hopping adds an amazing nose to the beer but it also adds essential hop oils that add an amazing flavor. Brewers grow to love hops whereas folks that have only consumed beers from the beer isle at Publix are often woefully ignorant of what hops even are. This is not their fault, I blame the beer industry for this shameful lack of education. Fortunately we now live in a time of revived interest in this 5000 year old beverage and the craft beer movement has provided an opportunity to fall in love all over again.

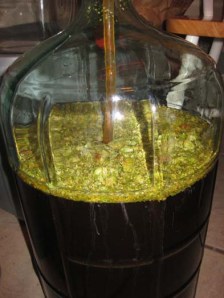
Racking the beer is not without some level of risk. The beer is exposed to additional oxygen using the siphon method to move it. The good news is that plenty of yeast are still alive and this process will tend to wake them up and get another (but much smaller) fermentation going. This secondary fermentation will help remove the excess oxygen that was inadvertently added during the racking. If this still worries you, there are ways to prevent exposure, remember it is up to the brewer to spend as much as their wives will allow in the quest for that “Best in Show” medal. This RyePA can safely reside in secondary for weeks but I wouldn’t leave them much longer than a month or two. During secondary the yeast will finish, clump (floc) and fall out of the solution thus clearing you beer. Your adjunct flavors will also infuse into the beer and all the simple sugars should have been consumed from the wort. At this point you’re ready to bottle or keg the beer. Both have their advantages but brewers will tell you, kegging is easier.

Once the beer is finished and ready to consume, it is important to prevent and or limit exposure of the beer to oxygen. A beer that is handled properly will last indefinitely. I routinely consume home brews that are 2 to 3 years old and as a rule, they are lovely. Some beer styles hold up better than others and like wine, some styles are meant to age and others to be consumed fresh. All will have a dramatically longer shelf life is kept cool and carbonated and free from exposure to air. Embarrassingly the kegs above have some mold and dust on the outside but experience has shown that it is what is on the inside that matters. One shot from the garden hose and these babies are ready to serve.

You have been reading an excerpt from the shop journal of the Turtlecovebrewer.
Turtlecove Brewing – Tour Part 1
Man this is one busy time of the year. Between work and the holidays I haven’t had much time to noodle in my shop. Last week Susan and I hosted Thanksgiving at our home in Melrose, Florida (aka Turtlecove) and having a couple of extra days there, I decided it appropriate to make Saturday a brew day. I hadn’t planned on brewing so we also made a quick trip in to Gainesville on Friday to purchase brewer’s yeast at my local homebrew store (LHS) Hoggetowne Ale Works. Like a kid in a candy store I purchased a “few” other items to the tune of about $130!
Since I didn’t have any time in my shop this week, I figured I could write briefly about how I brew at Turtlecove. Home brewing has some similarities to woodworking in that although the science and techniques are universal, the tools and processes individuals use vary widely. I would venture to say that no two brewers’ gear looks exactly the same because the majority of these systems are homemade. I love the quote I found by fellow homebrewers at “TexanBrew“, I think it describes homebrewing in a nutshell.
Brewing beer is neither complicated nor expensive. It’s the responsibility of the brewer to make it as complicated and expensive as their wives will allow. Great beer is made in small pots in a kitchen; our beer is made in larger pots in the garage. People have been brewing spectacular beers for thousands of years; we’ve been brewing mediocre beers for a few months. Since we’ve been brewing for months, we’re naturally experts.I can add nothing to better describe the craft or the mentality of the brewer.
The Process in Outline Form
- Malted grain is cracked (basically rolled) using a grain mill
- Water is heated to a temperature such that when the malted grain is added it steeps at the predetermined mash temperature usually in the range or 150-158° F. I commonly mash at 152° F.
- Enzymes in the malt slice up starch molecules in the grain producing different types of sugars. It is this sugar that the brewer’s yeast will ultimately consume.
- The mash liquid containing these sugars is called wort and it is run into the boil kettle for the next process, “The Boil”.
- In order to get all the sugary goodness from the mash, more hot water is added to rinse the grains. The rinse water is also collected to bring the volume of liquid wort in the boil kettle to the desired pre-boil level.
- Boil times are typically 60-90 minutes during which a variety of hops are added at predetermined intervals. Boiling the wort serves many complex purposes and the addition of hops at different times during the boil and of different varieties also serves complex purposes.
- The boil has to now be cooled to a predetermined temperature so that the brewer’s yeast can be introduced to their new home. This is typically between 45-72° F depending on the yeast used and the style of beer.
- Yeast are added and the Good Lord does the rest of the work to actually make beer
- After fermentation beer adjuncts are often added to the beer to add distinct flavors. Common adjuncts include oak, fruits, peppers, spices and in the case of homebrewers almost always fresh hop cones are added.
- The final step is to bottle or keg your beer and to carbonate and chill to serving temperature
Like making furniture, brewing is not for the faint of heart. We brewers find that once our brew day runs smoothly we often add an additional piece of equipment or additional step in the process to further complicate matters. If things DON’T run smoothly, we do the same thing.
Some of the Turtlecove brew gear
“The Beer Bitch”
This is the nickname my friend gave my brewing system before I was married with step-kids. My wife doesn’t appreciate the moniker and my children think it “swearing”.

A three tier stand welded from angled steel. Each level contains a propane burner. On top the uppermost burner sits the kettle for making hot water called the hot liquor tank or HLT. In the middle is the kettle for mashing generally called the “mash tun”. The mash tun has a filter at the bottom so the wort can be separated from the grain and run into the lowest kettle. The lowest kettle is the boil kettle and I have instrumented it with the most capable burner because it takes a lot of heat to boil 15 gals of liquid for 90 minutes. In this photo the top two levels are shown. Brewing occurs on the back porch which provides me a view of Turtlecove and the back yard.
Moving Brews
Three tiered brew systems are designed to allow gravity to move liquids between kettles. From the hot liquor tank through the mash, boil and finally into the carboy used for fermentation, the liquid can be drained downhill. That works and I made a lot of beer using this method until my beautiful wife bought me a pump for Valentine’s Day. Pumps add new capabilities, allowing liquid to be moved between kettles and even uphill if necessary. Brewers often purchase two pumps and they often mount them to their brew stand. I saw an article in “Brew Your Own” where a fella housed his pump in a tool box and I immediately loved the idea. My pump is portable, it can be placed where it is needed and can be stored inside out of the weather.


You can certainly get creative with this, I happen to have this toolbox at the house so I decided to go with it. This box even has a little room to store items that could come in handy on brew day e.g. hose clamps, spare o-rings, GFI adapter, etc.
Hoses
Now that I was pumping boiling liquids around I decided to upgrade to high temperature tubing and polysulfone quick disconnects (QDs). My method for connection was to place male QDs on all of the hard points and to make up hoses with female QDs on both ends. Thus I can connect any thing to any other thing using any of the 4 identical interconnect hoses.

Here’s a closeup of the male QD on the pump outlet. Notice the nifty bleeder screw on this ball valve. One of the problems with pumps is that they must be primed with liquid and this is another reason why a movable pump is a good idea. I can lower the pump below kettle level and open the bleeder to let off air in the line. When I get a steady flow of liquid from the bleeder, I can close it, open the ball valve lever and turn on the pump! This sounds elementary but believe me, many brewers including myself have been very frustrated with pumps that didn’t!
The Lab
I set up my utility room for the dual purpose of laundry and an indoor work-space. When I had the house built I wasn’t even a brewer but I liked the idea of an air-conditioned space where I could work inside so I rearranged things to line up my washing machine on side and a narrow counter along the opposite wall. I also had a laundry sink installed. This now houses my brewing equipment, provides a counter on bottling day and a wet sink for cleaning equipment and glassware.

Inexpensive mash paddle made from a small canoe paddle. As a fledgling woodworking I think I could now do better 🙂

Scales for weighing heavy stuff like grain (right) and light stuff like hops or bottling sugars (left). Rear left is my stir plate which is sort of homemade “commercially”. Stir plates are traditionally used to grow up yeast starters for brew day.

A bottle tree holds you bottles after you washed and sanitized them on bottling day.

Misc glassware. The flask can be used on the stir plate but in reality I make large starters in the big brown jug and it doesn’t work on the stir-plate.

The shelf above the laundry sink holds copper coils which are used for cooling the boiling wort to a temperature low enough to “pitch” (add) your yeast. The coils on the right are immersed in the beer and cooling water is run through the coil. The device on the left is referred to as a convoluted counter flow chiller which is actually two coils in one. Cooling water is run though the outer coil and the hot wort is run through the inner coils in the opposite direction (thus counter-flow). It is this counter-flow the allows the difference in temperature (delta T) to remain as high possible and thus it is a very efficient device for cooling. My wife also bought me this awesome gizmo. Again I point out the male QDs on all the “hard points” allowing all this to be quickly plumbed together.

This is a neat contraption. The copper ring is set upon the top of the grain bed and hot water can be let in such that it “sprinkles” through the grain bed. The thermometer lets me know the temp of the liquid being added and is removable so it can be used in several phases of brewing. Although not my idea, I made this version of the “through-mometer” myself from parts.
I’ve run out of time for this post but I will continue my tour of Turtlecove Brewing in my next post.
You have been reading an excerpt from the shop journal of the Turtlecovebrewer.
Kettles were struck at Turtlecove
After nearly a year long hiatus the burners were lit at Turtlecove Brewery yesterday. Home brewing, like woodworking is one of the more “practical” avocations. Home brewing draws interest from a wide variety personality types including foodies, gourmet cooks, gadget makers, biologist/scientists and folks that just plain like making their own adult beverages. With my background in IT and engineering I like the gadgets. My system is not particularly complex but it does have some upgrades including.
1. 3-tier/3-burner gravity fed system (no pumps required)
2. Welded steel stand
3. High temp quick disconnects (male on hard points with female on hoses)
4. Groovy toolbox pump as copied from an article in Brew Your Own
5. Multipurpose in-line thermometer
6. Very hot banjo burner upgrade for the boil kettle (recommended but keep plastic buckets well away from the boil)
7. Cooling ring to use the hot waste water to quickly cool the burner and kettle
8. Closed loop chilled water circuit for use once the wort temp gets down to 100 F (uses a small submersible fountain pump). I use empty milk jugs to make ice blocks for brew day
9. Copper sparge ring to rinse grains and return mash during recirculation
10. 11 gal capacity (10 gal of finished beer)

I realize that this may not mean much to those that haven’t yet studied this fine craft but I have really enjoyed home brewing and I’m proud of my system! Note: She’s not pretty but she’s functional.
Oh yeh, I almost forgot to mention that I brewed an American IPA style with rye (Rye IPA). I plan to finish the beer on oak chips. Did I mention this is Susan’s favorite?
-brewer art
Imperial Turtle
Travis and I whipped up 11gal of an ale that I classify as an Imperial American Amber. Starting with 30 lbs of six different grains, 12.5 gal of water and four different species of floral US hops we created a magical foodstuff for my half gal yeast culture. Travis and I are hopeful… We’ll find out in a couple of months how we did.
