Router Table Build – “On the Fence”
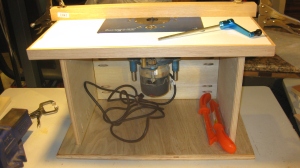
My wife Susan worked this Saturday so I spent most of the day working in the shop. The first goal at hand was to glue and tack (used my pin nailer set at 65 psi) the red-oak edge around the table. Last session I had milled them to the proper width and now all I had to do was to miter the corners and glue them on. “Did I mention that I’m new to woodworking”, he said with a wink? Yes, this was my first attempt to miter the corners and it was pretty bad. Really though I think I’m over it. I’m getting to the point where I’m actually surprised if something works the way I “think it should”. I figured that my attempt at 45’s would be off some but really I had more difficulty getting the length right. I was cutting everything too short. It was like I hadn’t accounted for the kerf but next time, I’m going to read up a bit and get some tips. I’ve read that when installing molding there are some tricks like undercutting the backside that helps to make a tight fit. No worries, this is not my last and only attempt rather it is my first try. I also want to try setting the pressure a lower on the pin nailer just to experiment. The pressure I used seemed OK but I’m curious if I couldn’t have done with slightly less penetration on the trim stock.
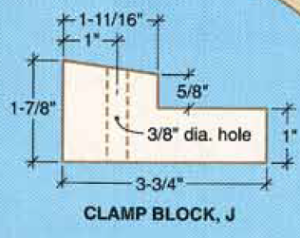
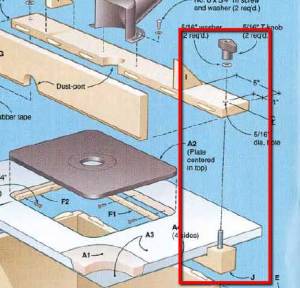
I wanted to get the edging on so that I could start work on the table fence. Having the edge in place would make measurements for the fence more straight forward (e.g. no surprises). Saturday afternoon I hand cut the 2 clamping blocks that will go underneath the table to hold the fence secure. These gizmos look similar to those called for in the plans only I modified the dimensions slightly to fit my actual build. I cut them from 1 1/2″ x 1 1/2″ poplar stock I had on hand so they didn’t come out 1 7/8″ tall but other than that I followed the directions.
When I went to cut the top angle down, I realized that I couldn’t do it with the miter saw and I had my doubts about free handing it with a jig saw. To my thinking this left me considering 2 options, sawing by hand (work!) or using chisel and plane. I thought I would try the later and soon realized that it wasn’t working out. I then had the bright idea to cleave off the piece with mallet and chisel. And guess what? It did exactly what I thought it’d do, it split down the grain and right through my line drawn for the angle. What a maroon? So this got me thinking about what I should have done in the first place and what worked absolutely beautifully was to pull out the belt sander and reduce the wood down to the line. I suppose a spokeshave and rasps might have worked also but the sander was easy and accurate. I then overcame my first mistake by first leveling, then regrinding the angle albeit a bit shorter on the clamp. They aren’t identical but I can’t see how it will make any difference on with respect to clamping the fence. And unless you crawl under the table and take the fence apart, I don’t see how you would notice. In any event, I didn’t want to make another one.
My wife had a bit of neoprene scrap on hand so I cut out a couple of pieces to glue on the mating surface of the clamp. I am hopeful this will form the proper grip on the clamp (plans call for rubber tape). If the neoprene doesn’t work like I plan, I can always swap it out for cork or drawer liner or something else until I get the grip I’m looking for.
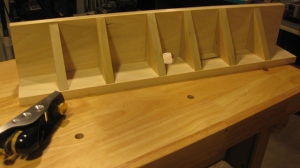
I finished Saturday’s work, by measuring and cutting the pieces for the fence and the angles that will become the bracing. Other prep work included routing a small rabbet on the face bottom edge for “dust relief” and drilling the 2″ holes in both pieces for the dust collection port. I used my Porter Cable hole saw bits and a hand held drill. I dressed the holes with a chisel, some sand paper, and my Dremel drum sander attachment. I you look closely you can see the dust port in the center.
This is a dry fit, I haven’t actually assembled the fence yet. I’ll cut a small piece of hardboard to cover the dust port collection in the center and cut a hole for my shop vac; pretty standard design.
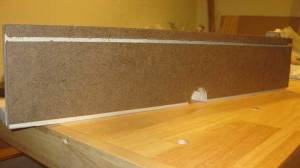
Sunday after church I spent a couple of hours in the shop while Susan took our oldest daughter Erin for walk. I was assisted by our youngest daughter, Alexandra who seems to have taken a geniune interest in my “strange work” in the shop. My goal for Sunday was to create a home made “T track” on the fence face so that I could make and attach accessories. (“Looking good Tim”). I started by routing a 1/2″ dado along the top edge of the fence then I cut a piece of hardboard to cover the face. Leaving the dust relief rabbet exposed at the bottom, I glued up the hardboard to the fence. After the glue had set, I routed the edge flush with my laminate trimmer. The last step was to change to a 1/4″ straight cut bit in the router table (I didn’t adjust the setting so the router is in the same position) and routed a smaller groove in the hardboard to form the “T”.
Being in a hurry, I now realize that I should have waited longer for the glue to completely dry but I wanted to get the edges trimmed flush and the groove cut before I had to quit for the day. The glue had made the hardboard very soft so instead of making dust, it tore like cloth or paper. The newly routed groove was not clean at all but once again, it is servicable and I was able to clean up a lot of the fibers. Once it completely dries I will be able to clean it up a bit more.
Next session, I’ll be assembling the fence. Unless I change my mind, I’m going to glue and screw the brackets using pocket hole screws. I haven’t yet attempted to drill the pocket hole into an angled board but I think it will be OK. After that I can drill the holes to accept the carriage bolt for the clamps.
I have already “crafted” some star knobs that I will use instead of the T knob shown in the plan. I’ll show you those next time however I will once again apologize for the level of their non-perfection. Repeat after me, “It’s OK this is only the first time I’ve ever attempted it!”
The Butcher’s Bill
I got off easy with only a small nick from my 3/4″ chisel (left index finger) and stuck by a pin nail (left thumb) while separating two test pieces of scrap. Oh and I almost forgot the tennis elbow of my right arm from using the Japanese hand saw (probably with incorrect form). I really have to get in better shape.
You have been reading an excerpt from the shop journal of the Turtlecovebrewer.
When cutting outsider miters I never, ever, ever measure. I cut one miter, but it up against the existing joint, and mark the other joints length with a pencil. Then you can saw it with your table saw or miter saw or by hand if you like. I generally can get it right the first time but if I don’t I always make sure to saw on the outside of the line because at that point you can fit it with a block plane if need be.
Table is looking great by the way.
Bill
Thanks for the tip Bill! I’ll definitely take your council and hope to get a little closer fit next time. I appreciate you taking time to read my journal and comment, it means a lot to me 🙂
I’ve been meaning to make a router table forever. I even bought the “delux router table” plans from the New Yankee Workshop website. I juat haven’t gotten around to attempting it yet.